Wednesday, November 30, 2011

Last three weeks

Start working on your next three week assignments.

Editors need you icon designs at the end of this week (thats friday).

Assignments for this three weeks

  • Blog Safety Check
  • Completed Yearbook Page #1 Approval Sheet
  • Completed Yearbook Page #2 Approval Sheet
  • Yearbook OoC Photos (50+)
  • Yearbook OoC Poll
  • Yearbook OoC Sales
  • Independent Photography Assignment
  • Independent Photoshop Assignment

Multimedia


Color Models
Still confused on RGB and CMYK? Learn more about CMYk & RGB. I found another interesting article, but only RGB. Try mixing the different colors of light and pigment in this online applet.


Download this Pages document on the Color Models CMYK and RGB.


Play with the calculators above. Each calculator gives the same data, use whichever you find the most useful. Notice, red is already filled out for you. Can you figure out where I got those numbers? Try recreating red to figure out where they all came from in the calculators. In the document, fill in the tables for each color, using the calculators. When finished, screenshot each color model and post them on your blog. 


Photoshop: Food Face
You Are What You Eat

For the next project, you will need to catalog the different things you eat for about a week. This project will be explained in more depth at the start of class.

Collect images of the different foods you've eaten. If you can find them on solid color backgrounds, it will be easier. Next, take another photo of yourself in photobooth, and open it in photoshop. Open up your food images in Photoshop as well, and using the lasso tool, magic wand tool, or just the simple eraser, try to separate the food from the background. Try to create a portrait of yourself from the foods you've eaten.

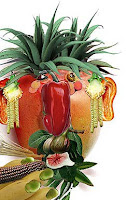
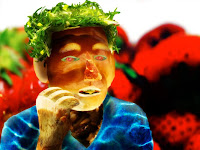
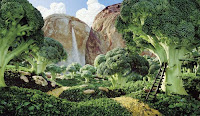
We'll continue this through next week, allowing you to slowly build up more foods to use for your portrait. Look at some examples below of food art. If you haven't finished the other photoshop stuff, you can work on it once you get to a stopping point for the day.

This will be a project, so you will need each part of the design cycle. Investigate, Plan, Create, Evaluate.


What's a collage? The internet seems confused on it. There are many people who think just a collection of pictures side by side is a collage. Luckily, those who create tutorials for photoshop seem to know what they're talking about. 


Some Food Collages


Check out Giuseppe Arcimboldo to see more examples.

Monday, November 28, 2011

Welcome Back


Hope you had a nice holiday.

The three week period ended last week. Anything you haven't finished yet? If so, you need to show it to me TODAY! Many of you are missing quite a few things. Check what's past due and make sure you haven't missed anything. If there are any blanks in the book, then that assignment isn't affecting your grade yet, and hopefully you've already gotten it taken care of.
Here's a link to the post regarding assignments for the the three weeks.

Saturday, November 26, 2011

Welcome Back

Hope you had a nice holiday.

The three week period ended last week. Anything you haven't finished yet? If so, you need to show it to me TODAY! Check what's past due and make sure you haven't missed anything. If there are any blanks in the book, then there's something that I'd like you to fix on it (or if it's the freechoice tutorial for multimedia, then I'm still waiting for you to post your work).

Next class we'll get started on our Photoshop Project. You'll have some homework that goes along with it.

Done? Check out the
RGB & CMYK Keynote Presentation

Monday, November 21, 2011

Wednesday, November 16, 2011

Robotics

Today & Friday, I want you guys to create some plans. What are you planning?

Show me on your blog what your able to get completed:

Couple things:
Sensors
Plan how you'll show me that you can get all four sensors to work (independently or multiple at a time is up to you).

The Course
I want you guys to design the course. We're going to start talking about robots in space, and so the theme for the course is a robotic rover on Mars. So, plan what would your robot would do on Mars (collecting data and samples). Also, start planning and designing the course and obstacles. Your welcome to do some research regarding robots in space and Mars to aid you. I'd like to see some sketches of the different planned obstacles and course layouts.

Their is one sort of twist to this challenge. When you guys are programming, you'll need to use the sensors in the programming. While there are a lot of things we can do in space with robots, and we can steer them to some degree, we certainly can't accurately land a craft or robot in an exact location, only in a general area. As such, when your robot is to complete the challenge, it will be placed in a general location but not always in the exact same spot. By using your different sensors, you should be able to get your robot to do what it needs to.

Final Robot
Start planning the design for your robot to effectively complete objectives related to to data collection for this task. I'd like to see some sketches of what your robot might look like. Remember, the course is being designed by multiple groups, so the final course will likely be a blending of them. A couple different designs would be useful.

Next Presentation
If your stuck on the previous things, you can also start looking into what you want to present on next.

Multimedia

If you are still working on the previous tutorials, get those finished first.

Next, we need to start talking about color spaces.
Tell me about CMYK & RGB (in your own words, of course).

Heres a few things that may be videos that may help, start at the top and work your way down:


How far did you have to go down the list to understand what the acronyms CMYK and RGB stand for? What do they acronyms stand for and what are they? When do we use them? How does CMYK work, and how does that compare to how RGB works? One of these videos says one is better than the other, do you agree?
As always, you are welcome to check out other resources on the internet too.

Photoshop Tutorial
There's SO much photoshop can do. For our big project, we'll be creating a collage (more about that later), but we're not quite ready yet. With how much photoshop can do, I don't want to limit your perceptions of it, nor limit your own creativity. I'll give you a little bit of freedom and let you decide the next tutorial you want to complete. Not sure where to begin? Try using words like beginner photoshop tutorials in the search engine of your choosing. You'll find tons of neat things you can do. Try to find one that you can work on for a good amount of time and teach you some new skills. Don't choose something too simple, but don't choose something way beyond your skill level either.

Show me your finished results and provide a link to the tutorial you used. Even if your unsuccessful and decide to switch tutorials, show me what you tried to do and your results. I can only grade what you provide evidence of.

All Finished?
If you have everything complete you should have SIX photoshop images on your blog:

  • Experimenting with Photoshop (whatever you created the first class day when you were given time to experiment and play with photoshop)
  • Free-form Pen Drawing of a free stock/public domain Photo
  • Free-form Pen Drawing from a Photobooth distorted image of yourself
  • Andy Warhol-esque Image of a free stock/public domain Photo
  • Andy Warhol-esque Image from a Photobooth distorted image of yourself
  • Free-Choice Tutorial
In addition, you should have fixed your illustrator projects to have all four parts of the design cycle evident, and have the self analysis on your blog.

Lastly, you should also have the Explaining File Types post on your blog, which was an assignment last six weeks that got pushed back due to many of you not noticing it while you worked on your Illustrator Projects.
Tuesday, November 15, 2011

Yearbook

Your polls are due today.

Not being here today, let me know what you got done today. I can only grade the evidence you provide, show me on your blog or google.doc a document to me. Keep in mind that there's a quiz grade for when I'm away, and that grade is based on how productive you are and what you show me you got completed. You guys are already aware of this, so I won't be going back in later to change these grades if you've suddenly discovered what you completed later on.

Use your time effectively and wisely. If the sub has any issues, it'll be a detention for whomever is the cause (you should already know this).

Continue working on your assignments. Due to Thanksgiving break, progress reports we'll seem to get here sooner than you think. It is then that your page approval sheets are due for the page you began last six weeks. The next page check (for your new page) will be next Monday/Tuesday when I'm back (just before Thanksgiving).

Keep in mind your continuing photography and photoshop assignments. Even if you have no pictures or if you have some sort of other page issue, you can still work on these. Check previous posts for more details about them if you're unsure of what they are.
If you haven't voted for us today in the Clorox Grant yet, you can do so now. Don't forget, you can vote every day!
How to Vote:
- Text: Clorox4546 to 44144
- Online: Power a Bright Future (<- won't be able to vote if facebook is blocked)

Continue current assignments

Extra Credit?
We need a new video for our school. Create one for extra credit!
Talk to your instructor for details.


Multimedia Today

Multimedia - Tuesday the 15th

Today we'll play with filters. They're pretty cheesy, and are definitely a relic from when the reason to do something to a photo with a computer was just because it was new and we could. However, they're still kind of fun to play with, and are an easy way to start getting more acquainted with photoshop.

It is important for me to state that they are not entirely useless. When combined artistically and effectively with other techniques they still have their uses. However, to use them well, it requires a lot more than just applying the effect. We'll play with them (and the hue & saturation) to create something somewhat akin to artist Andy Warhol's widely known Marilyn Monroe screen prints.

Dont forget, you can click on any of the images in the post to enlarge them. If you need help, ask me or one of your peers.


First things first:
Find a stock-free or public-domain photo you can play with. Red pandas are probably my favorite little critters, so here's my photo of choice.


Giving credit to where credit is due:
(you should do this too!)
Roberts, Torli. "Stock.xchng - Red Panda (stock Photo by Torli)." Stock.xchng - the Leading Free Stock Photography Site. HAAP Media Ltd, a Subsidiary of Getty Images, 25 July 2006. Web. 08 Nov. 2011.

We're going to turn him into a pop-esque art styled piece. Once you find a photo you like, save it to your desktop.

Second: Right click on the photo and click open with > Adobe Photoshop CS4


Third: Your photo is probably bigger than we want it. I decided to crop mine into a square, as I felt it'd work better that way. Use the Rectangular Marque Tool in your Tools Window. we're going to use it to select the part we want to keep. With Marque Tool selected, click and hold down where ever you want the top left of your picture to begin. While still holding down on your mouse clicker, drag the Marque Tool down to where you want the bottom right corner of your photo to be. If you hold the shift key as you do this, Photoshop will keep the proportions of your selection as a perfect square.

If you are happy with your selection, in the overhead menu at the top of your screen, click Image, then click Crop within the drop down menu. If you aren't happy with your selection, you can try again. To get cancel your current selection, in the overhead menu at the top of your screen click Select, then Deselect in the drop down menu (the hotkey for this is command + d).

Forth: Despite this, your photo may still be too big to work with easily. To print something professionally at high quality, you need big files. However, since we're just going to be uploading this to our blog lets make it smaller and easier to work with. At the very top of your screen, click Image and then Image Size from the drop down menu. Lets make it around 250 x 250 pixels.


Fifth: Now we have a nice size for our image, but we need multiple copies of them, and we need a bigger canvas so we have more space for them. It's easier if we make the copies first, then increase our canvas size next. In your Layers Window (open your layers window if it isn't already open), right click on your image and tell it to Duplicate Layer. Tell it to Duplicate Layer eight (8) times. Eight!


Sixth: Now it's time to increase our canvas area. Click on Image in the overhead menu again. This time, click Canvas Size in the drop down menu. The difference between Canvas Size and Image Size is that Image Size changes the size of EVERYTHING in your picture, where as canvas size just changes the size of your work area. Lets make our Canvas three times the size of the image we are using. If you made the image 250 x 250 pixels earlier, then the size of your canvas will be 750 x 750 pixels.


Seventh: Our canvas is a nice size, and we've got 9 pictures to arrange around the space (original + 8 copies). Now it's time to move them to the different sections of the canvas. You'll need to use the Move Tool and the Layers Window. Wheres the Move Tool? Don't panic, that's just the official name for the black pointer arrow in the Tools Window. In your Layers Window, you'll need to select a layer and move the image on it to where you want it. You'll need to do this for each layer separately, one at a time.


Eighth: We now have the image setup the way we want it, and can now start playing with different filters and the hue and saturation. Lets play with Hue & Saturation first. In the overhead menu, click Image then hover your pointer over Adjustments, and finally click Hue/Saturation. You can use this to play with the coloring of each layer. Just like everything in photoshop, your changes only affect the layer you currently have selected, so to adjust the other layers, you'll need to select them then reopen the Hue/Saturation tool.


Ninth: When your happy with the different colored variants across your image, then lets play with Filters. They can do lots of interesting things. With how long photoshop has been around, and with how novel and cool they were when photoshop was young, they've been way over used. When not used subtly and artistically, they often feel tacky or cliche now days. Don't worry about that for now though. Just play with them and see what they can do.

In my example, I have Accented Edges under the Brush Strokes category highlighted. You don't have to use this one. There's quite a few, so explore and see what they can do. Apply a different filter to each of the 9 images. Some of the filters are effected by what colors you currently have selected in your Color Window. Some filters will also change the Hue & Saturation, feel free to readjust hue & saturation if you'd like to. Upload your finished image to your blog.


Andy Warhol also created a lot of self-portraits (although most of them weren't multiple screen prints in different colors, like the Monroes), some with very high prices. Can you do this again, but with a distorted photo of yourself (Use the distortion filters in Photobooth)?


Not exactly Warhol, but amusing.

Friday, November 11, 2011

Multimedia

Continue working on the tutorial from last time. You should have two finished creations, one of an animal of your choosing, and one of a cartoonish picture of yourself (distort it with photobooth when you take it).

Thursday, November 10, 2011

Robotics

What you show me counts for a quiz grade today.

First: Technical drawing sheets (2 + scratch paper)

Second: I've found two games that are robotic/programming related.
Try them out and tell me about your experiences on your blog:

RoboZZle
Program a small ship to collect stars

Alchemical Engineering 
Program robot arms to create and move alchemical compounds

Yearbook

I'm not here today, that means what you show me is a quiz grade. If its not up today, then it will be  counted late.

In the previous post is a list of the grades for this three weeks.

You may not have everything you need yet to do much for your page. If that is the case, you should focus on photography or photoshop assignments for now. What you do with those is up to you, you just need to show me what I'm grading for these.

Photography:
You have a basic understanding of the basic concepts. You decide what you want to go into more, then show me the evidence of what you learned/gained/etc.

Need some photography inspiration? Check out The Atlantic's In FocusBoston Globe's Big Picture, or National Geographic's Photography Site.

Photoshop:
Use resources or tutorials, etc to create something useful for this yearbook. Not sure what to make, you can ask your editors what sort of graphics they are looking for/need.


OOC Sales:
Due at the end of this six weeks. They could be selling yearbooks, ads, etc. Each $50 you bring in moves you up a letter grade. To get credit, the ad from or book sale that comes in needs to say referred by ___________ (with your name where the underline is).


OoC Poll due Wednesday/Thursday
Ask 5 people, write down their name, grade, and answer choice
What kind of phone do you own?
a) iphone
b) andriod
c) blackberry
d) other
e) don't own a phone

How much time do you spend on your phone?
a) less than an hour
b) 1-4 hours
c) 5-8 hours
d) 9-12 hours
e) 13+ hours

How many apps do you have?
a) 10 or less
b) 10-20
c) 20-30
d) 40-50
e) 50+

What your most used app?
a) facebook
b) messaging (sms, email, etc)
c) twitter
d) other


Tuesday, November 8, 2011

Multimedia

I'm not here today, that means what you show me is a quiz grade. If its not up today, then it will be  counted late.

Illustrator Projects:
We'll need to spend part of this six weeks on design cycle. A little more than I had intended actually. Many of your projects that you turned in didn't show evidence of all four parts of the design cycle. Many of you said, in the self assessment, that you think you made a 4 on this part or a 3 on that part, but what you turned had no evidence of that section at all. In those situations, you'd have a zero for that criteria. We'll need to fix that.

Below I have a couple links to projects that looked the way I was expecting. They lumped all theirs together in one big post, but that isn't the main point. Instead, notice how each part of the design cycle is fleshed out in regard to their project.

Graphing Scientific Data
Digital Manifestation


Fix yours to make sure that all four parts of your design cycle are evident for your project.


First Photoshop Tutorial
If you try the tutorial below, and just aren't ready yet, scroll down to the bottom and you can find some basic photoshop links. If you read the text below and look at the pictures (if you click them, they get bigger), you should be able to manage. Also, feel free to ask a peer (two heads are better than one).

Yes, there's a lot of reading... I know... I know. It still took a long time to make the tutorial even with the few photos provided. We used it last year too, and the students were pretty successful without too much trouble. Ask a peer or me for help if you need it.


First Photoshop Tutorial
Freeform Pen Tool Tutorial
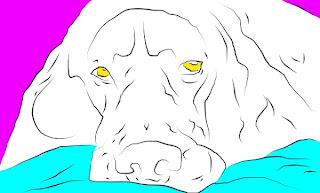
First, find a photo you have permission to use (like from a free stock photography site) that you'd like to make into a pen illustration (don't forget to cite it in your blog entry). I found this picture of a dog on my favorite stock photo site. 

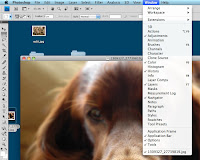
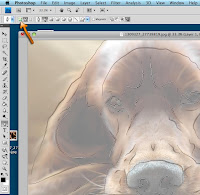
After saving it to your desktop, right click on it and tell it to open in photoshop. There are a few windows that are really helpful to have open. I don't know why this version of photoshop doesn't have them as default, but it doesn't. So, in the overhead menu, click window, and then make sure that adjustments, color, history, layers, and navigator all have checks next to them. If any of them don't, go ahead and click on them.


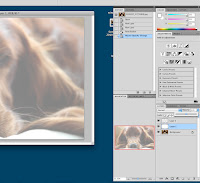
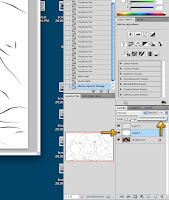
Next, in the bottom right of the layers window, tell it to create 2 new layers. Its the little icon right next to the trashcan in the bottom right of this image.


Use the paintbucket tool to paint 'layer 1' completely white. See where it says opacity in the layers windows? Change its opacity to around 50%. This will make that solid white layer translucent. Click on 'layer 2' to work on that layer so we can keep our drawing and background separate.


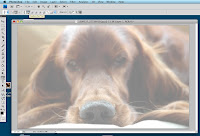
Now choose the pen tool, and the menus at the top should change. Make sure the icons at the top of your screen look like mine. This includes changing the pen into freeform mode. With the pen tool in freeform mode, you should be able to trace over parts of the image. The pen tool will still do funny things from time to time, as it will decide to smooth your lines out here and there. That's just how this tool works. Keep your fingers near command + z to undo and try again when your not happy with what the pen tool did.

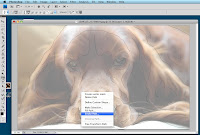
Once you've finished drawing the picture, right click and choose Stroke Path. A small window will pop up, make sure the drop down menu reads Brush and that you have Simulate Pressure checked. When you used the paint bucket tool, you had the color selector on white, if you dont change it, then pen stroke will all be in white too. note: if things turn out weird, then you probably have the brush set on too large of a size. Talk to your instructor and I'll help you.


Now the pen lines have nice strokes behind them, using whatever brush, size, and color you currently had selected. However, the pen paths are distracting as to what it really looks like. We can take care of that real quick by just changing the pen's mode. Click where the arrow on the right shows to change modes.


Now we just need to change the background to white. Switch back to the second layer and change the opacity back to 100%. Now its just you and the pen drawing. Now is the time to go in and add some color.


Create a new layer and make sure its between your white background and pen drawing (if not, drag it there). By painting on this layer, you are neither affecting the background, nor the pen lines. If you mess up, you've affected neither and can erase as needed with out affecting your pen lines or background. So select this new layer and use the brush tool to paint things as you wish. My painting was just of solid colors without any blending, but if you want to do something more complicated, it might be a good idea to create multiple layers to paint on. By doing this, you can paint different parts of your picture on different layers, not having to worry about messing up an area you already finished.


The last thing to do is save it. You can either go to file > save as, or file > save for web. What the difference? Save as will leave the image at a higher quality, but will take longer to upload into blogger, and take longer to load. By playing with save for web, you can decrease the quality to increase the speed at which it will load. When printing, you want the highest quality possible, however on the web you want lower quality images so people can actually view the image. Graphic designers normally will keep their high quality original and a smaller low quality version for faster loading. Don't forget to save your image as a jpeg, as a psd (photoshop file) won't load on your blog. Upload your image to your blog. Don't forget to cite the original.

My Finished Result

Don't forget to cite your source!
(I forgot last year, and now I can't find it! Sorry!)

Try again with a photo of yourself:
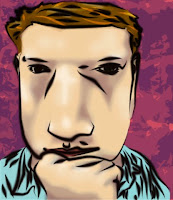
Do the same exercise, but instead of a free stock image, we'll make a cartoon of ourselves. Open Photobooth, and go into the effects (the second set to be specific), and find an interesting or amusing distortion of yourself. On some of the filters, you can adjust how much it distorts it. My distorted cartoon is on the left. It doesn't really look like me, but its amusing. 

Besides, if it really looked like me, it wouldn't be too safe to put it online. After finishing the pen drawing, I just colored it. Obviously my coloring for this example is much more complicated than on the example of the dog, but yours doesn't have to be. I like my illustration of the dog just as much as my cartoon character.

To get your photo from photobooth to photoshop, you can either drag it from the selector on the bottom to your desktop (and then right click to open with), or screenshot it and then open it into photoshop. Since the original image is your own, you don't need to cite it.


Need more basic Photoshop help?

Monday, November 7, 2011

Yearbook

I'm not here today, that means what you show me is a quiz grade. If its not up today, then it will be  counted late.


New Six Weeks
Here on out, majority of classes will be work days to work on whatever you need to do. Each three weeks, you'll have the same assignments. You decide when to work on what to best use your time.

As your previous page should be complete, its time to sign up fro a new page.


Due this three weeks:
  • Blog Safety Check
  • Completed Yearbook Page
  • Yearbook OoC Photos (50+)
  • Yearbook OoC Poll
  • Independent Photography Assignment
  • Independent Photoshop Assignment

Due at the end of the six weeks:

  • Yearbook Book/Ad Sales

Multimedia

Welcome to the final six weeks for this semester. Say goodbye to Illustrator for now and hello to Photoshop. Majority of this six weeks will be focused on Photoshop, or things related to our work in photoshop.

Before we get too into discussing Photoshop, lets take a look at what you produced last six weeks in Illustrator. Using the IB Tech Criteria, I would like you to self-assess the work you posted on your blog. These are the same IB Criteria that were referenced in regards to the grading of your projects.

With us being new to IB still and the complexity of Illustrator, we haven't fully worked through the Design Cycle yet. This six weeks, we'll look at the parts we haven't discussed yet. For now, don't worry about the strike-out text.

IB Tech Criteria
Criterion A - Investigate
0 No standards described below are reached.
1-2 Problem is stated and investigated.

Information from sources is collected.
Some specifications are listed
3-4 Problem is described and investigated and its relevance mentioned.
Information from a broad range of appropriate, acknowledged sources is collected.
A test to evaluate the solution against the design specification is described.
5-6 Problem is explained and investigated and its relevance discussed.
Information from a broad range of appropriate, acknowledged sources is collected and evaluated.
Detailed methods of testing to evaluate the solution against the design specification is
described.


Criterion B - Designing
0 No standards described below are reached.
1-2 One design is generated.
Some justification against the design specification is attempted.
3-4 A few designs are generated.
One design is justified by fully evaluating it against the design specification.
5-6 A range of feasible designs are generated.
Each design is evaluated against the design specification.
Chosen design is justified by fully and critically evaluating it against the design specification.


Criterion C - Plan
0 No standards described below are reached.
1-2 A plan with some detail regarding steps and materials is produced.
3-4 A plan with detail containing logical steps and resources and use of time is produced.
Evaluation of plan is attempted.
5-6 A plan containing greater detail with regards to logical steps and describes the use of resources and time is 
produced. 
 
Critical evaluation of the plan is conducted. 
 
Modifications to the plan are justified.


Criterion D - Create
0 No standards described below are reached.
1-2 A product is at least partially created.
The plan is considered.
3-4 Appropriate techniques and equipment are used.
A product of good quality is created.
The plan is followed and any changes from the plan are mentioned.
5-6 Appropriate techniques and equipment are competently used.
A product must be of appropriate quality in respects to requirements and resources.
The plan is followed and any changes from the plan are justified.
Appropriate Quality: The best product or solution that can be produced in respect to resources and time available, skills and techniques used, educational development, how it addresses the need, and aspects of safety and ergonomics.


Criterion E - Evaluate
0 No standards described below are reached.
1-2 The product or student’s own performance is evaluated.
Product testing is at least attempted.
3-4 The product and the student’s own performance are evaluated.
Possible improvements to both product and student’s performance are stated.
Product is tested and evaluated against the design specification.
5-6 The success of the product and the student’s own performance are evaluated based on
results of product testing in respect to design specification and views of intended users.
Possible improvements to both product and student’s performance on each stage of the
design cycle are described. 
An appropriate evaluation of the impact to the product on the environment, society, and life
is produced.


Criterion F - Evaluate
0 No standards described below are reached.
1-2 Satisfactory personal engagement or a satisfactory attitude towards safety, cooperation, and
respect for others is occasionally displayed.
3-4 Satisfactory personal engagement and a satisfactory attitude towards safety, cooperation,
and respect for others is frequently displayed.
5-6 Satisfactory personal engagement and a satisfactory attitude towards safety, cooperation,
and respect for others is consistently displayed.


Photoshop
For the remainder of today, I'd like to let you explore Photoshop (whether your a newbie or a pro). Look into and try things that you don't already know in Photoshop. Your welcome to look up stuff online to help you in this. Show me your results and post any links for any useful resources you found and don't want to forget about.