Photoshop Tutorial
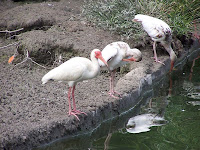
Many images online have already been tweaked with photoshop or some other photo editing program. To see the difference this next activity makes, start with an average photo that looks like it just came off a camera with the typical flattening effect indoor lighting seems to produce. I have provided a few links below, start with one of these, and once you complete the tutorial, you can try it with an image of your preference.
At the bottom of this page are links to more beginner photoshop tutorials. If you're having trouble it might benefit you to try some of them first.
Original
New
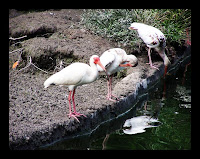
de Vera, Katherine. "Stock.xchng - Tropical Birds 2 (stock Photo by Skarlyt)."Stock.xchng - the Leading Free Stock Photography Site. HAAP Media Ltd, a Subsidiary of Getty Images. Web. 05 Nov. 2010. http://www.sxc.hu/photo/533941.
After going through the tutorial, you should be able to make a photo not only look nicer, but also load faster!
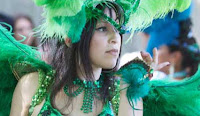
Follow along the steps as the original author edits the picture on the right. Don't forget you can click any image to enlarge it.
10 Must-know Introductory Photoshop
Skills For Beginner Photographer
by Bakari Chavanu
1. Duplicate The Background Layer
The first thing you want to get used to doing is making a copy of the background layer of your image. The Layers palette should open by default, but it is also found by clicking onWindows>Layers in the menu bar of Photoshop.
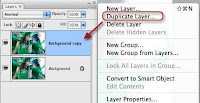
Select the Background Layer and click on the little triangle at the top right of the palette. When the palette options open, click Duplicate Layer, or you can use the shortcut keystroke,Command+J (Mac users) or Alt+J (PC users.)
By duplicating the background layer, you can make all types of adjustments to duplicate layers without permanently changing the bottom background layer. If you make some adjustments you don’t like, you can drag the duplicate layers (with all the adjustments and effects you made to them) to the trash at the bottom right of the layer palette.
2. Automatic Image Adjustments
When you start learning how to use Photoshop to improve your photos, you might want to try out some of the automatic adjustments that can be made, even if you don’t understand the tools themselves.
The basic image enhancement and adjustment tools in Photoshop are found underImage>Adjustments in the menu bar. In the Adjustment palette, there are various tools likeLevels…, Auto Contrast, Curves, Brightness/Contrast.
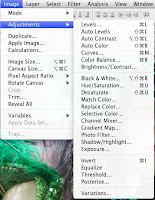
To introduce you to these adjustment tools in this introductory photoshop tutorial, I’m going to suggest that you use the automatic and preset features of these tools. As you begin to understand them more, you will make use of manual adjustments.
So with your background layer duplicated and selected, click onImage>Adjustments>Auto Levels in the menu bar. When you release the mouse of the menu item, the automatic Levels adjustment should enhance or at least affect the shadow (dark), midtones, and highlights (bright) areas of your image. Often, a photo can be improved in Photoshop with just the automatic adjustments applied.
3. More About Layers
Now let’s revisit how layers work. Go back to the Layers palette and click on the little eye next the Duplicate layer that you just applied the Auto Layers adjustment to. When you toggle that little eye off, it means that you’re turning off the adjustment or effect that you made in that layer. Since the adjusted layer is on top of the background layer like a clear transparency, you can toggle the eye off and on to see how the adjustments are applied to the background layer (also remember: you can drag the duplicate layer to the trash to get rid of the adjustment(s) all together).

4. Automatic Curves
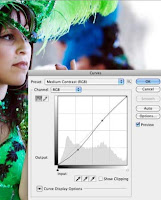
Okay, let’s return to a few other automatic adjustments and enhancements you can make to your photo. Go back toImage>Adjustments and then click on Curves. The Curves box will open. This box may look seriously scary with its grid, points, lines, and ear droppers. But don’t worry about that. We’re simply going to use some automatic adjustments to see how Curves can impact your photo.
Click on the button next to the word Preset. In the drop-down box, selectMedium Contrast (RGB). If you don’t see much of a change in the contrast of your photo, go back to the Preset button and tryStrong Contrast. You should be able to see the effect of the Preset on your photo before you click OK. Curves works similar to Levels but with more intensity in contrast.
Much more could be said about Curves and Levels, but this is just an introduction. You can play around with the points in the Curves box and see how they affect your photo. Remember, the changes you make are non-destructive to your photo, so you can experiment as much as you like. The illustration below explains a little about how the three main points in the grid function. If you make a mess of things, simply click Cancel and start over, or click OK when you’re satisfied with how the photo is looking.

5. Make Colors Pop
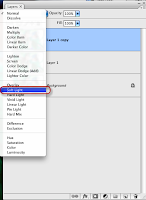
Okay, now lets move on to learn about other enhancements that can be made. One of the tools I use on nearly all the images I bring into Photoshop is one called Soft Light. Here’s how it works.
Go back to the Layers Palette, drag all the layers, except the background layer to the trash. Click on the Background layer and create another duplicate of it. Now click on the Normal button at the top of the Layers Palette. In the drop-down box, select Soft Light. When selecting this adjustment, it should make the colors of your image pop, or at least intensify the contrast of your images. The contrast of most digital images always need to be improved. This technique does that job extremely well without too much loss to detail.
If the Softlight application is too strong, select the Opacity button at the top of the Layers Palette and decrease the opacity of the layer/effect.

6. Black-And-White Conversion
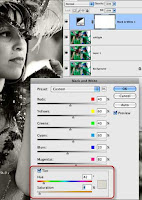
One easy and popular tool you want to know about in Photoshop is how to make a black-and-white conversion of an image. There are entire books written about black-and-white or monochrome conversion using Photoshop, but I‘m going to show you a quick, down and dirty way to do it.
Again, duplicate the background layer, and this time click on the little black/white circle at the bottom of the Layers Palette. When the drop-down box opens, select Black & White. The adjustment box will open and you should automatically get a preview of the black-and-white conversion of your image.
Again, you can play around with the settings, but the one I suggest is clicking the Tint box and then moving the Saturation slider all the way to left and then moving it back a little towards the right. When you select the Tint box, you might get a sepia effect on the image, so just desaturate the sepia effect until it looks okay to you. After you click OK, you’ll now have your black-and-white conversion.
7. Resizing & Cropping Images
Many times you’ll bring images into Photoshop and you will want to print them. Well, printing photos requires that you resize your photos to fit the size of the paper you want to print on. Say I want to print this photo on standard 8.5 by 11 paper. Well, to get the image to fit well on the photo paper, I need to change the size.
When I click on Image>Image Size in the menu bar, I can see that the original size of the photo is 15.84 by 10.5. That’s of course larger than I want. But when I try to change the numbers to 11 by 8.5, the proportional sizes don’t quite fit. So what I need to do is crop the photo for the size I need.
To do this, click on the Crop tool in the Tools Palette. It should be open by default, but you call also open it by going to Windows>Tools.

Now drag your cursor over the image. The resulting crop box should only allow you to stretch it to 11 x 8.5 inches. You can move the crop box around to get the framing and crop you want.
8. Image Border
Another tool that beginning Photoshop users might want to know is how to add a border around an image. Again there are a few ways to do this. One way is to select the top layer in the Layers palette. Next click on Image>Canvas Size. In the dialogue box that opens up, change the Width and Height to both to .2. Choose a color for your border. Make sure the center of the Anchor box is selected. Click OK and you should see a border around the image.
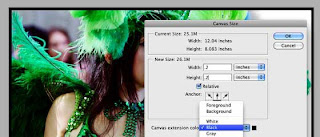
9. Saving For The Web
If you're in yearbook, you probably don't want to bother with this. We need the photos as high quality as possible for the yearbook, and converting for the web decreases quality and size.
One of the biggest issues with digital images is that many people don’t know how to resize photos for emailing and web posting purposes. How many times have you clicked on an image or received one or several in an email and they were too large for good viewing? Photoshop comes with a Save for Web feature that helps you resize photos.
One of the biggest issues with digital images is that many people don’t know how to resize photos for emailing and web posting purposes. How many times have you clicked on an image or received one or several in an email and they were too large for good viewing? Photoshop comes with a Save for Web feature that helps you resize photos.
First off you can click on Image>Image Size in the menu bar to view and resize an open image in Photoshop. You can either change the pixel dimension or document size of the image for the size you need. For example, the average size for web posting and emailing photos is 800 x 600 pixels. This is also a good size for slide show presentations. Images should rarely be larger than 1024 x 768 pixels, because that is the typical size of largest computer monitors. If you need a particular print size, you would change the document size, making sure that the Constrain Proportions box is checked so that the image won’t get stretched on either size. You might have to use the cropping tool as explained above to get the correct size you need.
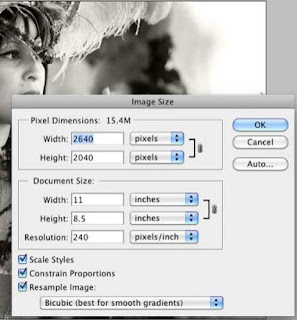 With your image resized, you’re ready to save it for web posting. Click on Save>Save for Web posting and devices. In the resulting dialogue box you want to check the number on the bottom left of the image box, which is the current resolution size of the photo. It also gives you an idea how long will take that photo to download at its current size.
On the upper left side of the window, you can select up to four views of image, each giving you a preview of the image quality at various sizes. When the resolution size is reduced, pixels are taken away, which results in a loss of detail or sharpness in an image.


You want to reduce the size of the image to say less than 100K, but maintain good image quality. In the top box on the upper right side, click the Presetbutton and select PNG-24 or JPEG High. PNG format typically gives you a smaller resolution size without too much loss of quality. The Quality button on the right side of the box can also be used to lower or increase the resolution size. The presets typically work fine. Just make sure you notice if the size you choose causes the image to look slightly blurry or smudgy.
After you change the resolution size, check the size again (bottom left) to see if a good size for posting. Finally, click the Save button. Photoshop will save a copy of the image where you tell it to. It will leave the original untouched.
10. PSD vs Non-PSD
Finally, when you go to save a file that you have been working on, there are two things you want to consider. You can save it in the Photoshop (PSD) format which means that you will save all the adjustments you made to the image, plus the various layers that you created when making adjustments and adding effects. This means that your file is typically going to be larger than the original size you started off with. But it also mean that you can reopen the file, and the layers and edits you made will be retained so that you can make more changes or complete the job.
Another way to save a file in Photoshop is in a non-PSD format, such as JPEG or PNG. Saving a file in one of these formats means that you’re not going to retain the layers when you save. What will be saved are all the changes you made and applied to the original photo. The layers will be gone. If you didn’t make a copy of the original photo before bringing it into Photoshop and you save it as a JPEG, you will lose that original state of the photo.

So when saving a image in Photoshop, it’s best to first save it in PSD format (even while you work on it) and then click File>Save As to save it in a non-PSD format. You can always delete the PSD file when you no longer need it.
Last note: If you can't make it look good in photoshop, if it even starts looking like its been digitally edited, stop and go back to the original. An image that looks altered is worse than one that isn't touched up at all.
Other Starter and Basic Photoshop Skills
Last note: If you can't make it look good in photoshop, if it even starts looking like its been digitally edited, stop and go back to the original. An image that looks altered is worse than one that isn't touched up at all.
Other Starter and Basic Photoshop Skills